Summer of Local Foods


What does “Local” mean to you?

This winter, myself and a small group of self-proclaimed local food enthusiasts posed the question “What is Local?” to everyone we could get a hold of – neighbors, friends, business owners, small farmers, large farmers, gardeners…

Results were varied, to say the least. Although people overwhelmingly believed that local should mean grown in their community – the definition of community could mean their hometown; a certain mile radius; a portion of the country; or simply grown in the USA.

As I’ve mentioned before, living in downtown Minneapolis put me within walking distance of a handful of farmers’ markets.  These markets are as much of a social gathering as they are a means to stock up on items for the week ahead.

This summer I’ve made a commitment to drive the hour every Saturday to our local farmers market and hopping on board a #SummerOfLocalFoods

I find myself getting to know the handful of vendors that are so passionate about what they grow and raise; and in turn they get me to try new foods (pea shoots, kohlrabi… to name a few).

Now, is farmers’ market food more expensive? Maybe.  Depends if you’re talking about the actual money you dish out or the expense on our environment to get much of the produce you see in the supermarkets.  See what I did there?

Yes, an onion for $2 seems steep, but how often do you buy a bag of onions where half of them go bad before you get to them?

Or, when was the last time you’ve actually TASTED a carrot.  Not just a crisp, orange log that vaguely tastes like nutritious soil [clearly I’m not a big fan of the carrots I grew up with…] but a REAL carrot. Take it from me, more times than not if you try a farmers’ market variety you’ll discover that you may actually LIKE a vegetable you’ve previously written off.

These carrots were so pretty I actually put one bunch in a glass vase and displayed it on my counter for a day or two! (From Springerridge)

I find myself being more resourceful when not confronted with 10+ aisles of food and freezer-ready meals.  I find that I spend less time and money at the grocery store.

After all, in one day I was able to purchase from each of these food groups:

+ Baked Goods. Bleu Cheese & Bacon Loaf; Peanut Butter Oatmeal Cookies
+ Meat.  Canadian Bacon; Soup Bones (for the pup!)
+ Veggies. Onions, Green Beans, Pea Shoots, Carrots & Scallions.
+ Herbs. Rosemary & Basil
+ Dairy. Tomato Basil Cheese

The farmers’ market trips are a start, and I’m proud of the movement in Pierre to get more local foods in peoples’ homes, grocers and restaurants.

One small step, right?  I dig it.

* Looking for the deets on the Pierre area farmers markets? Take a look at Country Farmers Market & Capitol City Farmers Market

** Check out the results of our foods study here!

*** Follow our Dakota Rural Action chapter “Greater Oahe Action League” on Facebook!

img_1876

A lunchtime collection from my backyard garden!


Advertisement

Belizean Shrimp

As soon as I read the blog post accompanying Half Baked Harvest‘s recipe for “Honey Garlic Butter Shrimp in Coconut Sauce” I had to try it.

Inspired by her sibling’s travels through Central America, this dish captures the flavors that I remember from my own honeymoon to Belize: seafood, coconut, rice, spicy and sweet, fresh.

Unable to locate avocados nor plantains in the middle of the Midwest, I opted out and just enjoyed these delicious shrimp over rice made with coconut milk in my pressure cooker.

I also had to opt in freeze dried ginger and frozen cilantro, but the local honey from our fields and basil from my garden really shine through!

Check out Half Baked Harvest and all Tieghan’s beautiful food photography and inspiring dishes on her blog!

Now, if I could only get my lips on a Belikin…

Part II: The Concrete Countertop Project

Previous: Chaotic Kitchen Remodel
Previous: Part I: The Cabinet Refinishing Project

After that kitchen cabinet refinishing, my poor fingertips needed a break from all that tedious sanding.

Once I made up my mind to start the counterop process, I quickly realized the cabinets were just the beginning of my time with the sander during this kitchen project.

Let me back up.  I had intentions of replacing my well-worn Formica with the economic choice of new high-definition laminate countertops.  I’ve had these installed at numerous job sites, and I enjoyed their ‘ease of ownership’ factor (meaning first-time-homeowner-proof!), plus have you checked out the new modern patterns and prints? Formica(R) even has a Jonathon Adler line!

When the prices came back my jaw hit the floor – THIS is the price for LAMINATE?!

(In their defense, we have that weird angled corner that adds several cuts and seams)

Back to the drawing board. Er, the Pinterest board.  Try searching “cheap countertop alternatives” and a whole plethora of ideas come up with varying mediums.  I narrowed it down to three looks I felt I could work with:

  1. Building Wood Countertops.  Think butcher block look.  Ruled out because it wouldn’t work in a kitchen already boasting wood cabinets and wood paneled walls…
  2. Paint Kits.  Rustoleum has a great countertop kit that looks like a great alternative to breath new life into existing, solid laminate countertops. Ruled out after serious consideration because, well, I liked the third idea better.
  3. Concrete Countertops. So trendy. So cool. So contrasting to my current woody situation.

After I decided on concrete countertops I discovered there was a whole market of new products for concrete counters that include expensive concrete and edging forms, to build-your-own-box-and-pour.

Then I discovered Ardex. 

Oh it was love at first sight.  I read as many blogs as I could find on it – and luckily the blog world is so kind to link to other DIYers trying the same thing!

The folks over at Young House Love were the most thorough I found, and had follow up posts discussing different sealants and longevity.  They led me to other amazing sites that I suggest you read, take notes, and re-read before attempting this yourself!

With my decision made, here it goes…

Ardex Concrete Countertops Step-by-Step guide

Step 1: Get Husband’s Approval

I printed mood boards, examples, and finally told him “it couldn’t hurt?” He agreed. At least that’s how I remember it.

Kitchen Inspiration Board

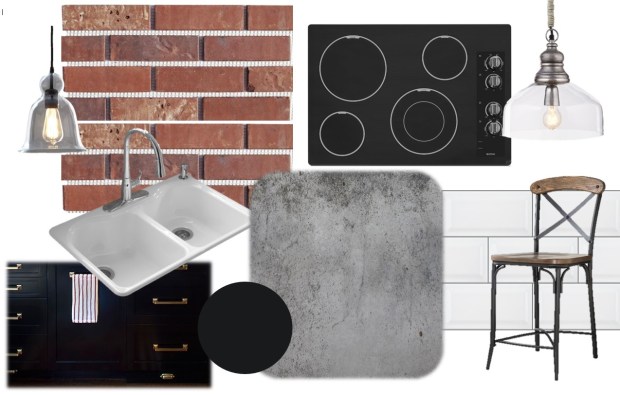
I’m a mood board enthusiast. This was simply thrown together in Word.

Step 2: Source Supplies

For me this was one of the most time-consuming steps (and once you get to the bottom of the post, you’ll realize that’s saying something!).

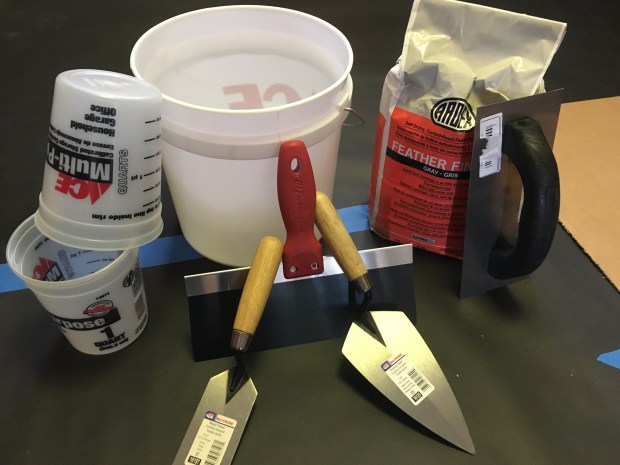
Living in the middle of South Dakota, I had to order the Ardex (found it on Amazon) and the sealant (more on that later) online ahead of time.  I had no idea how much I’d really end up needing, and none of my trusty blog resources could really tell me.  For reference, I had approximately 40sqft of counter space and used 1.5 bags of Ardex.  In retrospect, I’d get an extra bag to be safe – as I mixed very sparingly to make sure I didn’t run out.

Step 3: Prep 

First and foremost, Ardex will get EVERYWHERE.  Dripping and dropping big splats of the mixture on your floors and cabinet fronts is inevitable, but the worst culprit is the dust. Fine, grey, light… dust.

It gets inside your closed cabinets.  It travels to the other end of your house into your bedroom. It settles in your ductwork; on your windowsills; in your carpet. So PLEASE. Seal your kitchen. I did not seal.  This is regret #1.

Step 4: Demo!

What day is it? DEMO DAY! (Anyone else a Chip&Joanna / Fixer Upper fan here?)

Replacing the sink and the cooktop was an easy decision for me since “we” decided both of these items lived through their useful life.  Couple things I learned from this:

(1) Look for any brackets, screws, or fasteners holding your appliances in place – taking out the stove resulted in a major chip in the laminate;

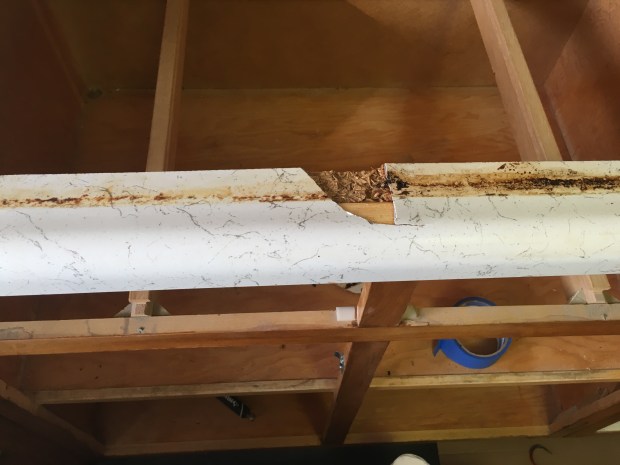
(2) Measure your new items and do a trail install to make sure your existing countertop holes are the right size. Both the sink and the stove were different than their predecessor… oops. Luckily we had some friends with the right tools to cut through the existing laminate;

(3) Take photos of the existing hook-ups – both electrical and plumbing.  This I did NOT do ahead of time, thinking the sink was pretty standard (because I know anything about plumbing…).  Come to find out that our sink drains were a bit of a headache and we had to hire it out in the end.

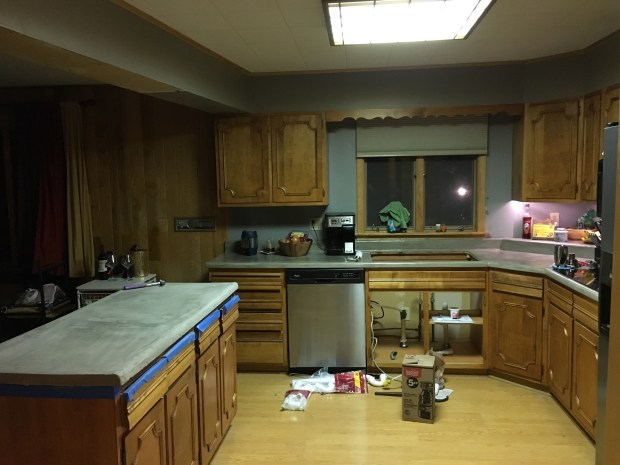
(Don’t mind the hideous state of my sink cabinet. Or the innovative duct taping of our dishwasher drain by my husband…)

Step 5: Sand

Wait… I thought countertops were supposed to be my BREAK from sanding!

HAHAHA. No. What DIY project would be complete without a bit of sanding and elbow grease?

img_0295

So I sanded by hand. Then my friend and co-worker (sounding board, craftsman, remodel extraordinaire…) convinced me a rotary sander was the way to go.  As little as I admit it, he was so RIGHT!

The process calls for lightly sanding the laminate countertops, followed by a light sanding between each layer. Ardex is specifically engineered to stick to smooth surfaces – the sanding was just to get any sealant and leftover food gunk that could come back up through the finish.

This is where I remind you about the fiiiiiinest layer of grey dust will end up settling over EVERYTHING in your house by the time you are done with this?  If you were smart enough to heed my advice and tape plastic over your doors and enclose your kitchen for this project, props to you.  If you’re like the rest of us, just leave it until the end.  There’s no winning in a war against air particles.

Step 6: Mix, Smooth, Sand, Repeat.

This part I found oddly satisfying.  Working in small batches,  I found it much like a recipe:

Ingredients:
1c Ardex Feather Finish
1c Water

Equipment:
1 Disposable Mixing Bucket
1 Mixing Tool
1 Spreading Tool

  1. Combine ingredients.  1:1 ratio Ardex to Water.
  2. Mix mix mix. This mixture only gets better the more you mix it – so give it your all!
  3. Rest. Leave the mixture alone for 10 minutes. Mainly for the Ardex to set a bit, partially for your arm muscles to recover.
  4. Spread. The goal is for thin, even layers. Remember (or maybe I haven’t told you yet…) this entire project takes 3-4 coats minimum!
  5. Touch-Up. Wet your fingers and lightly smooth out any imperfections, bubbles, humps, divots, or scratches.
  6. Cure. I left the countertop alone for a minimum of 8 hours – but I waited and did one layer each day after work.
  7. Sand. For this I used a mixture of rotary sander on the flat surfaces and hand sanding around the edges.
  8. Dust. You will want to vacuum as much the dust off the surface as you can, then use a  damp paper towel to remove any of the remaining particles.  Tack cloths can leave a residue, so I do not suggest using one.

It doesn’t set too quickly, but you do want to work fast.  I plopped concrete on the countertop and spread it across in a thin layer – as thin as I could without scraping the countertop.

The trick here is having a well-mixed, consistent mixture so that when you’re doing an excellent job spreading it thinly, you don’t get a hard chunk of concrete scraping through your smooth surface.

For the edges, I did my best using what professionals call an “extra-wide taping knife” to pull the concrete down from the surface, then I’d repeat coming up from the edges.  Eventually it dries a little to a pliable consistency like clay where you could use your fingers to smooth it out.

Step 7: Seal.

Much like the previous step, it consists of a series repetitious steps. This is where you follow the instructions of the sealant that you chose.  Not knowing much about this ahead of time, here’s what I concluded:

  1. Wax. Does not work. This is made for actual concrete countertops, not Ardex.
  2. Penetrating Sealant.  I saw a post use it and it seemed to work, but as I did  not quite understand it, I cannot speak to this method.  I worried it was much like the Wax and meant more for concrete countertops.
  3. Polyurethane.  Gives a high-gloss, hard surface when dry.  Can be very tricky, and if applied wrong it’s next to impossible to remove.
  4. Acryllic/Lacquer. A hybrid between an acryllic seal and a lacquer. Still glossy (although you can get Matte), a thinner mixture, but requires multiple layers to apply.

For me, my biggest concern was choosing a food-safe option and fairly idiot-proof in case I applied it wrong or didn’t like the affect.

After reading endless reviews of the sealants mentioned in the other blogs, I went with AFM SafeCoat Acrylacq found on GreenBuildingSupply.com

The product itself was very easy to use and the smell didn’t bother me at all.  It went on with a simple bristle brush and I ended up doing 3-4 layers.

*I’ve added my thoughts on my sealant at the bottom*

Step 8: Dust, Vacuum, Wipe, Dust.

I ended up taking every single item out of my lower cabinets and wiping them down before replacing since the dust penetrated every nook and cranny.  After this was complete, I was able to have the sink re-installed with the new plumbing and disposal; as well as the new stove placed.

I removed the tape, dusted again, and tore up the floor coverings.  Then swiffered the floors from all the dust.

img_0680img_0677

I added the cabinet knobs back onto the doors after a quick spray paint with Rustoleum Oil-Rubbed Bronze to make them pop against the golden oak and add more of an industrial feel to tie in my new countertops.  Oh, did I mention dusting again?

End Reviews + 4 Months

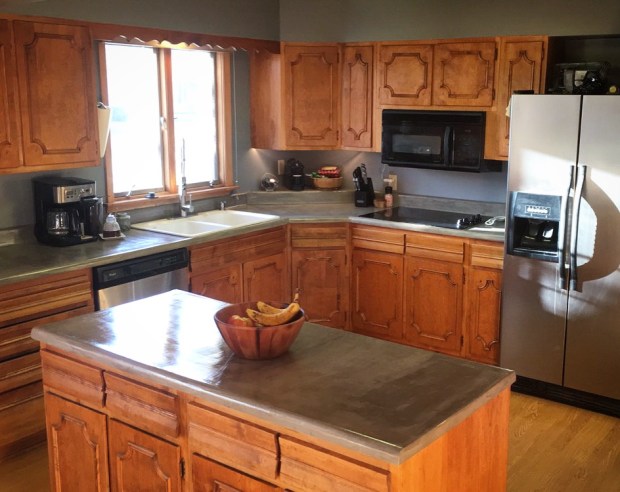
I love how these turned out. For a mere ~$300 I have modern, “new” countertops.  I produced almost no waste in the process, which is always a bonus.

Of note, the countertops are neither heat-resistant, nor are they meant to be used without a cutting board.

Standing back, the variations in grey color that is natural in concrete is exactly what I wanted.  I love the imperfections, the darker areas and the texture naturally created when I troweled it smooth.

IMG_0724

And… the *’s

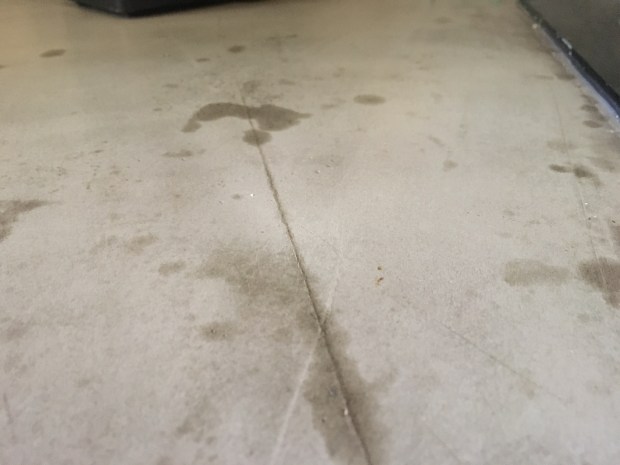
I do have one problem: sealant.


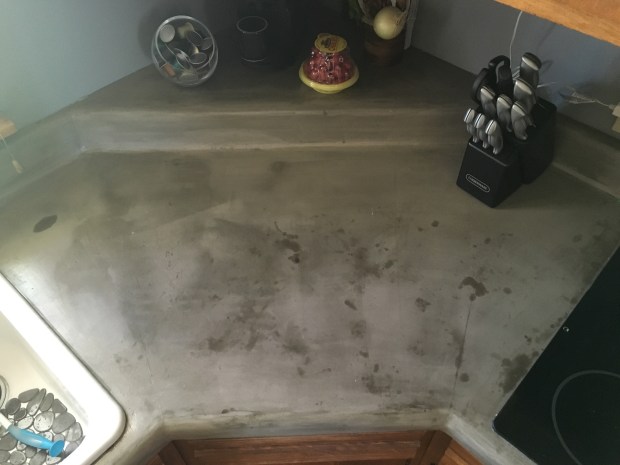
I did the water-bead trick to make sure the sealant layer was thick enough and didn’t let water soak through to the concrete.  It worked like a dream.  Water is quickly wiped up and whisked away.

Oil and acid is a different story – and a huge problem in a kitchen.

At this point, I can sand (oh no…) off the sealant and top layer to apply one additional Ardex layer + new sealant.  I’m debating using a polyurethane this time, but am still terrified to use it for fear of permanently screwing it up.


The moisture along the seal of the old laminate concerns me as well. Wondering if moisture is coming up from under the sink cabinet and seeping through? We may never know… 

After 4 Months:

Would I do it again? Yes. Absolutely, yes.

What would I do differently?  Take more precautions against the dust; use an electric sander from the start; and obviously choose a different sealer.

Would I recommend it?  Probably.  If you have the time, patience and willingness to tackle a week-long project, then yes.  If you can afford an actual concrete countertop, then probably not.

Any and all comments and advice would be appreciated!

Thanks for reading about my Kitchen Remodel!  I’ll be sure to update with any new information I get from you readers 🙂

Also, how do we feel about painting the cabinets a dark color (see mood board above)?


CC-

There were only a few clouds standing out against the bright blue spring sky; the wind was blowing steadily as a welcome relief to the hot, relentless sun; it was a perfect day for branding cattle.

Now, that’s my opinion as a bystander. I’m sure the workers in full-length clothing beg to differ.

It was my first time joining my husband and his family to brand our cattle. A few weeks prior, the heifers’ calves were branded and immediately followed by a nut fry. Although not wanting to miss out on some fresh Rocky Mountain Oysters, I was already committed to work at the steak house. Dang.

This cattle branding was the big one – some 500 calves were ready to bear the CC- brand.

The day of, I was able to squeeze a few hours of work in while a crew of family, friends, dogs and horses worked the cattle moving them to the branding pasture and separating the calves from the cows. At this point, each calf had a colored ear tag that signifies ownership and a number that links it to a cow and shows the year it was born.

I was able to hitch a ride with my husband’s aunt, who was in charge of the big dinner* we were serving the herds of hungry men, boys and some seriously talented women.  No stranger to the hunger that accompanies a branding, we loaded her pickup with roasters full of baked steak, mashed potatoes, creamed corn, and a big ole container of lemonade, and we were off.

(*Remember that here, Dinner = Lunch)

Winding our way up, down, and through the pasture to the corrals, we caught up with, then followed, those on horseback directing cattle through the gates.

Upon arrival, I quickly learned that branding day is about more than just the burning that big CC- brand into the side of the calves (a process I still wasn’t sure about up until this point…). The cows are guided through corrals where they received treatments and shots to ensure their continued health.

After the cows were taken care of, it was time to chow down. And no, the irony of serving steak at a cattle branding did not pass by me 🙂

Branding took place in teams: ropers, holders, branders, medicators, castrators, and kids to carry those little testes away.

Ropers on horseback roped a calf, dragging it out of the corral to the branding area.

Holders, one at the head and one at the rear, held the calf down on its side.

Branders made trips between the heaters holding hot branding irons to each calf.

Medicators gave the necessary rounds of shots to each calf, and also sprayed the incision that is part of the next process…

Castrators were tasked with emasculating the male calves, and handing the set of balls over to the kids who carried them to an ice bucket, that ironically was purple and featured a princess on the front of it.


Then there were obviously the bystanders (me) watching this process for two or more hours. I busied myself with taking photos, running waters (beer) around, and making sure the kiddos had a good view to watch the process.

The calves were later turned back to pasture. Acting like nothing had changed, but now sporting their fancy cattle brand signifying that they were officially part of the herd.

It was a full, sunny, hot, busy day. Enjoying a margarita was the perfect way to take it all in.

A Life Full of Lemons

Usually, the saying starts off with “When life gives you lemons…” but my supper inspiration actually starts off “When your neighbor’s dog craps in your yard…”

As much as I’d love a fenced, private back yard, looking out and seeing the empty lot behind us makes our yard seem that much larger.  Plus, it’s Vinny’s Frisbee course – so fencing is out of the question.

Without a fence, the neighborhood dogs (two large black labs and two small fat corgis to be specific) regularly come over to mark their territory over Vinny’s extensive marking.  Now that I’m trying my darnedest at gardening, I’m outside more and privy to witnessing the leg-lifting party that goes on when their owners aren’t looking.

But this day, the owner was outside. And his dog crapped in my yard.

So to apologize he gave me a bag of fresh-caught fish from the good’ole Missouri River. So what did I do?  Turned a “crappy” situation into grilled crappies over lemon noodles.

*pause for laughter*

I’ll be here all week, folks.


In all seriousness, I’m not the biggest fan of lemon.  Limes, yes. Lemons, not so much.  But I had two at the end of their life in my fridge, and a bunch of parsley starting to wilt.  Plus summertime calls for a bright, sunny interpretation for this fish.

I laid the fish out on paper towels to dry off while I boiled noodles to al dente and drained them.  In the meantime, I heated butter (the REAL stuff, people) in a cast iron skillet with minced garlic and fresh spinach.  After it cooked down for a few minutes, I tossed the pasta into the skillet and added the lemon and chopped parsley.


The fish I arranged over lemon slices in a grill basket, and topped it with tin foil.  I wanted to pseudo-steam, and the lemon helped so the fish didn’t fall through the grate, while imparting their flavor during the grilling process.  Hubby took it from here and manned his station at the grill.


One last toss of the noodles with some freshly-grated Parmesan and black pepper and it was ready to go!

I loved this dish even more because of the challenge of using up the forgotten ingredients in my fridge. I equally loved that the fish traveled no more than 15 miles from its watery home to my plate.  Oh and I didn’t have to clean it 😉

Summer is here. Bright, sunny, and deliciously so.

Kitchen Chaos

We have no yoga studio here.  No place for that hour of stretching, inward self-reflection that comes with doing yoga in a temperature-controlled room with the soothing words of a yogi teacher leading you through the moves.

Truth is, I hate yoga anyway.

I do, however, love cooking.  Food prep has turned into my meditation.  Isn’t there something immensely therapeutic about chopping vegetables into to exactly the same shape and size?  Except onions, they’re pull you back to reality real quick.

For as much time as I spend in it, I never loved the kitchen in our new house.  I didn’t hate it, but I definitely wouldn’t have chosen it.  White cracked laminate countertops and water-stained cabinets from  years of love and abuse.  But we were newlyweds and new homeowners, so we made it work.

See?  Our kitchen style used to be “trendy.”  However, I do not have shoes and a belt that match my appliances, so it was time for a remodel! (Photo Cred: Retro Renovation)

It wasn’t more than a month into living in our new house that one of our large burners on our cooktop started acting up (read: sparks flew when I turned it on).  Around the new year, one of the smaller burners suddenly stopped working.  Working with three burners I could do; working at 50% was not something I was going to settle for – I have needs.

So, with a minimal budget, lots of sweat equity, and many hours watching DIY tutorials, I started my chaotic kitchen remodel.

As any remodel goes, it ends up encompassing more than you initially set out to accomplish.  So for you, reader, I broke it down into two parts:

Part I: The (Old, Stained, Mid-Century) Cabinet Refinishing Project

Part II: The (Modern, Cool, Edgy) Concrete Countertop Project

If you think the posts are long, let me tell you the process was MUCH longer.  My fingers have yet to recover from the many hours of sanding (even with protective gloves!); my neck is still suffering the consequences from being hunched over for long periods; our laundry room sink has a new layer of concrete mud stuck to the edges; and there is a never-ending layer of fine, grey concrete dust covering everything.

All casualties aside, I think the finished product is absolutely worth it:

IMG_0724.JPG

So follow me on a trip down memory lane as I recount the best and the worst parts of the remodel; the successes and the setbacks.

Next: Part I: The (Old, Stained, Mid-Century) Cabinet Refinishing Project


Food-Phobia

I hated eating as a kid.  Ask anyone from my childhood and they probably hated trying to feed me even more than I hated eating it.  I hated textures.  I hated temperatures.  I hated smells.  I even hated words to describe food – like meatLOAF (still working on that one).  Simply put, I had so many other things I’d rather be doing than sitting still and eating.

Then, it all started to change.  Slowly, but change was eminent.  My mama’s words “You EAT if someone takes the time or spends the money to FEED you. It’s not an option. It’s polite.” echoed in my head when I’d go to friends’ houses.  A particular BFF in middle school had a father who worked for one of the best seafood restaurants in Minneapolis (I know, SEAfood, in Minnesota?  Four words: Flown In Fresh Daily) and I had a crab cake.  Then I tried crab legs, cracking shells and making a mess.  OK eating could be FUN too!  So, the seafood love was cracked (pun pun).  The same family also introduced me to Chicken Chow Fun, featuring a sweet, yet spicy, sauce, wide noodles, deliciously cooked chicken and egg scrambled in.  So now I had two major food groups to work with: sea food and Chinese. I should note that Italian and pastas were always a favorite – spaghetti and meatballs, pizza, mac and cheese.

Ask me any of my favorite foods and I can tell you exactly when I first tried it.

Sushi?  California in 9th grade visiting one of my mom’s best friends from her Up With People days.

Scallops?  Our annual family trip to Florida for Spring Break at a place called Tin City in Naples.

Whole Roasted Garlic?  A trip where a friend’s dad thought it’d be funny to pressure me in to eating a whole garlic head.  Oh my gawd, like buttah.

I could go on, but really huge props have to go out to my roommate in college for forcing me to try new things. I also owe my slow-cooker abilities to her.  Hi Erin!

Denver was the first to open my world to farmers markets and the world of locally-grown produce.  Moving back to Minnesota, there were 3 farmers markets close to my downtown condo; a balcony to grow my own herbs; and a plethora of restaurants to explore and try new things (head cheese comes to mind as the most adventurous…)

Moving into the Heartland meant a huge adjustment to so many things – but one of the biggest was my grocery shopping.  I went from walking down the street on Saturdays with my reusable bag to driving to the town’s grocery store.  For the staples and packaged goods, it now means an hour drive… to shop at Wal-Mart (don’t get me started).

I’m not trying to throw myself a pity party.  After all, 46.2 Million people live in “rural America” according to the USDA ERS (if you like graphs and charts of this data, click here!).  Whatever that means.

Simply put, if I want it I gotta grow it, or find someone who does – and boy do I like a challenge!

As you’ve seen from my posts, I now have 2 years under my belt of SoDak gardening.  This year will be the first year I’ll have my garden in my own back yard – Hubby even tilled* an additional garden plot for me this fall (see post photo).  The pup has no problem getting comfortable, no matter where my garden is!

941318_2708867082237_1661660484_n

Vinny in my Minneapolis balcony garden

VinnysGarden

Vinny in our new home’s garden!

I’m currently in the planning stages and trying to maximize production and preservation this year.  Goals?  Well thanks for asking! Here’s what I hope to accomplish this year:

  • Seedlings.  Hoping to start my own seedlings of a majority of my vegetables, although I’m intimidated to start my own tomatoes.  I’ve had success with herbs, zucchini, squashes, beans and peas in the past.  Any extras I don’t use in my garden I’d like to donate to kids for their own gardening.
  • Efficiency.  I want to utilize every square inch of my garden – for example,  planting early-harvest veggies in the space that bigger plants (squash, watermelon, tomatoes) will take over when they are full-grown.
  • Canning. I mastered the “easy canning” technique with tomatoes last year, but I hope to get more proficient and have a lot more stored up for winter.  My 5 huge jars of tomatoes only lasted me until January. Whoops.

Have I rambled on enough?  Nothing gets me more excited than the prospect of sunshine and long, warm summer days!

My garden first had the Year of the Zucchini.  Last year was the Year of the Tomato. What will this year bring?!


*Note: As a woman married to a No Till Farmer, I must make a side note that in this case tilling was acceptable – breaking ground and adding in nutrients from fallen leaves and other yard waste to decompose over the winter months 😉

flash forward

Flash forward a year from the last post. Yes, a  year. Actually a year and 10 days if you want to be exact.  A lot can happen in that amount of time, and I think we covered all our bases, like:

graduating my Farm Beginnings classes…

celebrating bachelor(ette) parties & bridal showers…

becoming a golfer…

finding and losing out on 3 potential houses…

then becoming the proud owners of a 1960s house in town…

boasting a plentiful tomato harvest (tomato game STRONG this year)

oh, and getting married. 

And that is just to name a few!  So now you see why I didn’t have a single minute to update with posts, pictures and stories.  Obviously, the  highlight was our Saint Paul wedding in August.  A years’ worth of planning, big decisions, little decisions, taste testing, vendor meetings, follow up vendor meetings, last-minute panic meetings, emails, letters, invitations, thank-yous…

I really was worn out from typing.

But this is it! We are now living the American Dream in the American Heartland. We have bills and budgets, jobs and schedules, and each other. It’s perfect.

The point of this blog was to articulate the stark differences from my life before I moved to South Dakota.  There are plenty, as I’ve mentioned previously.  The long car rides to get almost anywhere have become a time where I can catch up on my reading (audio books rule, in case you had doubts).  Late nights working mean I get to look up and see infinite stars.  Putting distance between me and my Target means… well it means more online shopping 🙂

I’ve dug in. And I like it. I really, really like it.


here we go!

well without further ado, I wish you a…

HAPPY NEW YEAR!

it’s been an exciting 2014 and 2015 is shaping up to be even better than the last!  the past year has brought an engagement, a big move from Minnesota to South Dakota, two new jobs, and countless new friends and experiences. twitter and facebook tell me this is the part where I hashtag #blessed – and in all seriousness, looking back, could I possibly be any more blessed?!

actually, yes.  because this year I get to actually marry that fiance of mine surrounded by all our friends and family.  it will be a long road to get there with so much to do (I may be a little bit of a budget-conscious-detail-oriented-perfectionist…) but when I do get overwhelmed I remind myself of all the items we already have checked off the list:

  • dress, done! (weddings 826)
  • photographer, done! (bernadette pollard)
  • videographer, done! (dave puente)
  • ceremony location, done! (st thomas more – summit & lexington)
  • reception venue, done! (harriet island pavilion – st paul)
  • room block, done!

now for caterers, florists, decor, cake, DJs, save the dates, invites, transportation… whew! DIY & budget-friendly tips are always welcome!

now for me to get my homework done for my Farm Beginnings class before tomorrow! I’m absolutely loving the people and the class itself, not to mention the fact I get to go to Rapid City and get my Target Fix in…

keep an eye out for posts on my DIY projects I’ve been doing for the wedding! (hint: I got a new Cricut Explore for Christmas!)

wishing you all the best!! xo


p.s. I challenge you to find another blog post out there with the tags “Cancun, New Years, Wedding, and Cows” like this one! hah!

… Is anybody out there?

(Drumroll please…)

Here it is – the first post!

I’m officially a South Dakotan!

I’ve settled in to the family cabin nestled along the Missouri River – a part known as Lake Oahe.  Although surrounded on either side by other cabins, a resort and campgrounds, the river is in front of me and corn fields (at least this season) are behind me.  Vincent is absolutely loving our morning “runs” which end up as more of glorified hiking/exploration trips.

Panoramic - River Vinny Fields

(Click the photo for full-size)

Additionally, Tuesday marked the first official harvest from my garden!  Unfortunately, I missed the boat with my broccoli and kale, which passed their prime and are being devoured by various garden insects.  Not to be discouraged – it is my first garden after all – I still have promising zucchini, pumpkin, eggplant, sweet corn, popcorn, string beans, snap peas, tomatoes, and pepper plants! Below is a gallery of my Garden so far:

I’m excited with what the future holds for us.  After all, South Dakota is the land of “Great Faces, Great Places,” and so far, it is fulfilling that promise.

And with that, I’ll sign off for now.  What’s for dinner (aka “Lunch”) today? Zucchini Spaghetti with meatballs. Recipe and photos to follow!